
Go to pharmatrust.tech and click Validate a COA free. Create an account with Google (you are signed in at once) or with your e-mail and a password, then sign in. Tick the decision-support notice once. On the dashboard click Upload COA, drop in the certificate (PDF, scan or photo) and click Upload. Back on the dashboard, click Analyze beside the file and read the report when it opens below.
Before you start
You need two things: a work e-mail address (or a Google account) and the certificate you want analysed, as a PDF, a scan or a clear photo. Nothing needs installing; everything happens in the browser.
The free plan needs no card. It gives five automated analyses in your first month, then three every month. Uploading a file does not use an analysis; only clicking Analyze does.
The screenshots in this guide were taken on the live site in September 2026, with demonstration accounts and a fictional certificate: Demo Pharma Industries Ltd, paracetamol, batch DEMO-2026-001. No real supplier's document is shown.
Step 1. Open pharmatrust.tech and click Validate a COA free
Go to pharmatrust.tech. The green Validate a COA free button is at the top right of every page and again under the headline on the home page. Both open the sign-up page.
Already have an account? Click Sign in, next to the button, and go straight to step 3.

Step 2. Create your free account
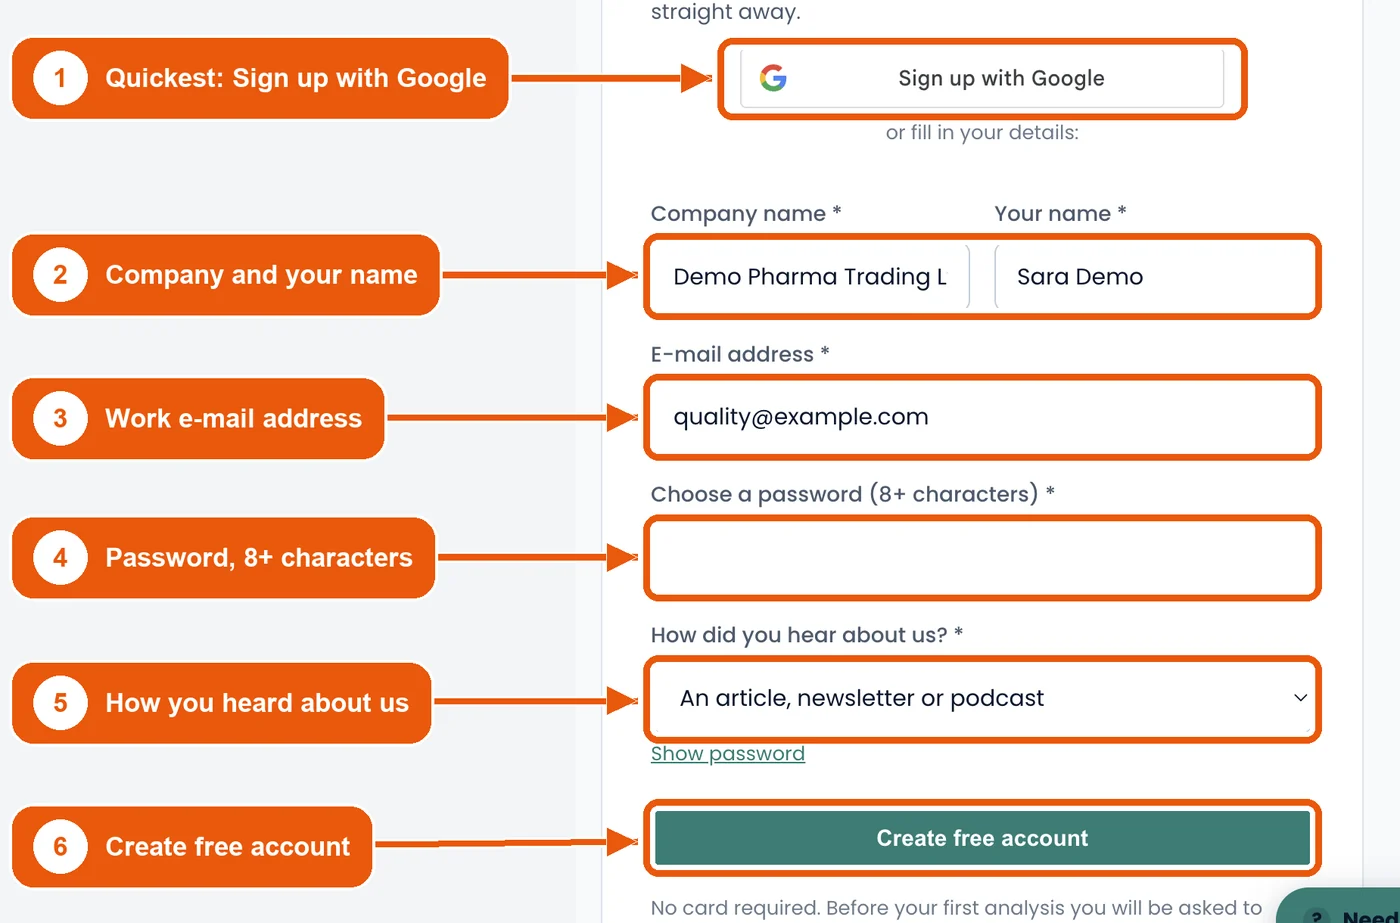
The quickest route is Sign up with Google (1): choose your Google account and the account is created from its e-mail. You go straight to the dashboard, with no password to remember; continue at step 4.
Otherwise fill in the form. Enter your company name and your own name (2), your work e-mail address (3), a password of at least eight characters (4) and how you heard about PharmaTrust (5). Then click Create free account (6). A confirmation appears and the page moves to sign-in after two seconds.
- Use the e-mail address your colleagues will recognise; reports and support replies are tied to it.
- If the page says an account already exists for that e-mail, use Sign in, or Forgot password on the sign-in page.
Step 3. Sign in
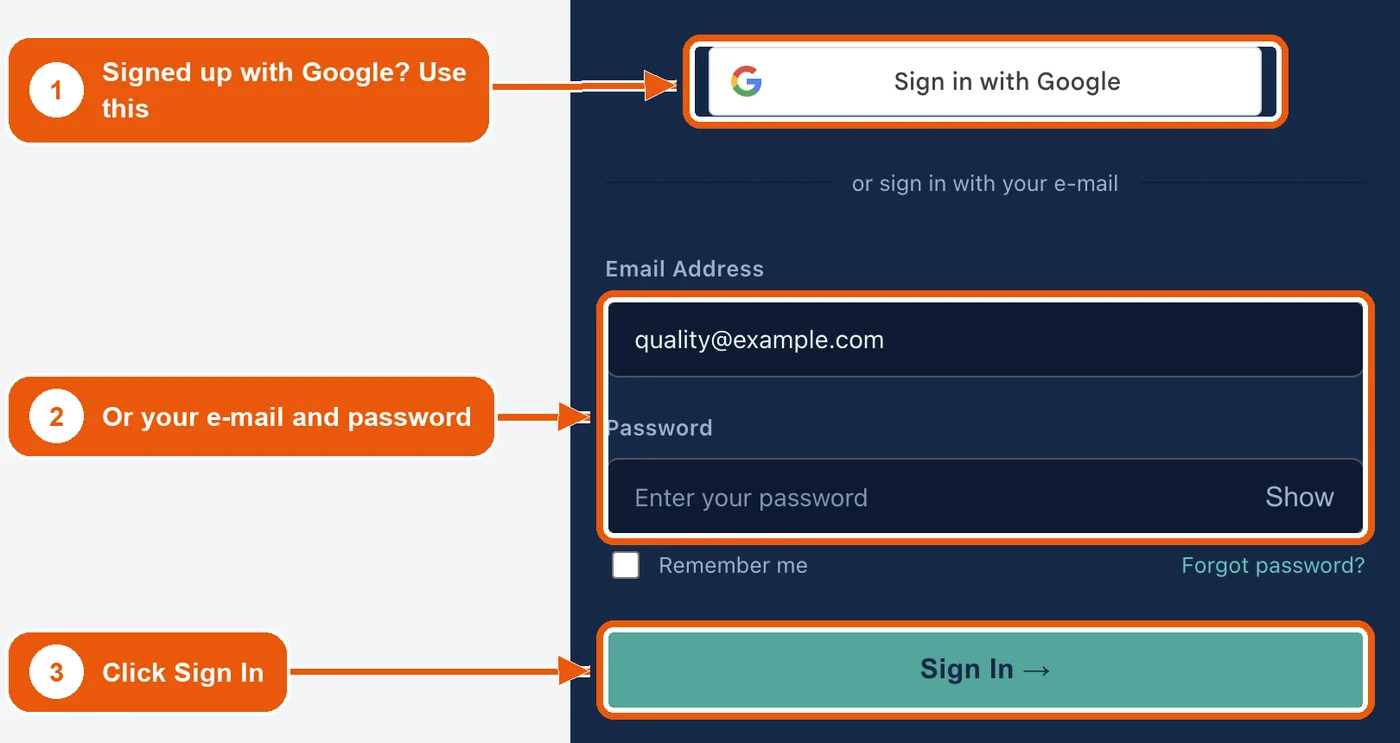
Next time, if you signed up with Google, click Sign in with Google (1). Otherwise type the e-mail address and password you chose (2) and click Sign In (3).
Tick Remember me on a computer only you use. Forgot password sends a reset link to your e-mail.
Step 4. Read and acknowledge the decision-support notice
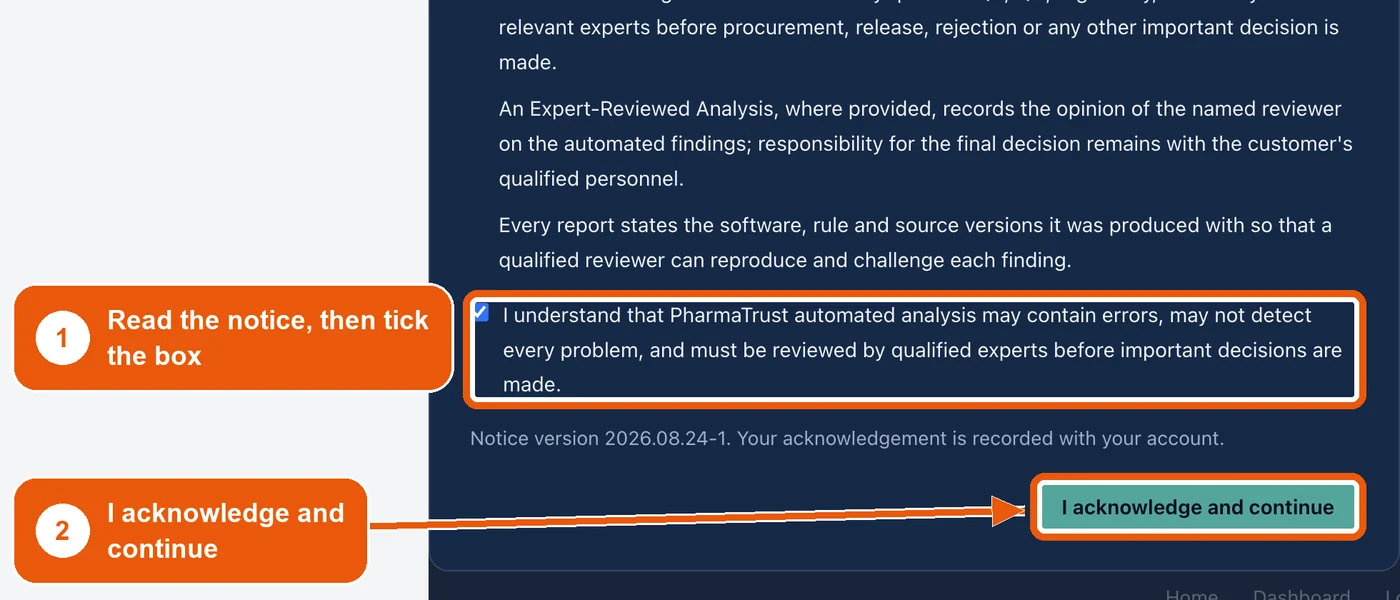
The first time you sign in, the dashboard opens with a short notice. It explains what an automated analysis is: decision support, not a decision. It may contain errors and may not detect every problem, and qualified experts must review it before any release or other important decision.
Read it, tick the box (1) and click I acknowledge and continue (2). The acknowledgement is recorded with your account; you see the notice again only if its wording changes.
Step 5. Get to know the dashboard
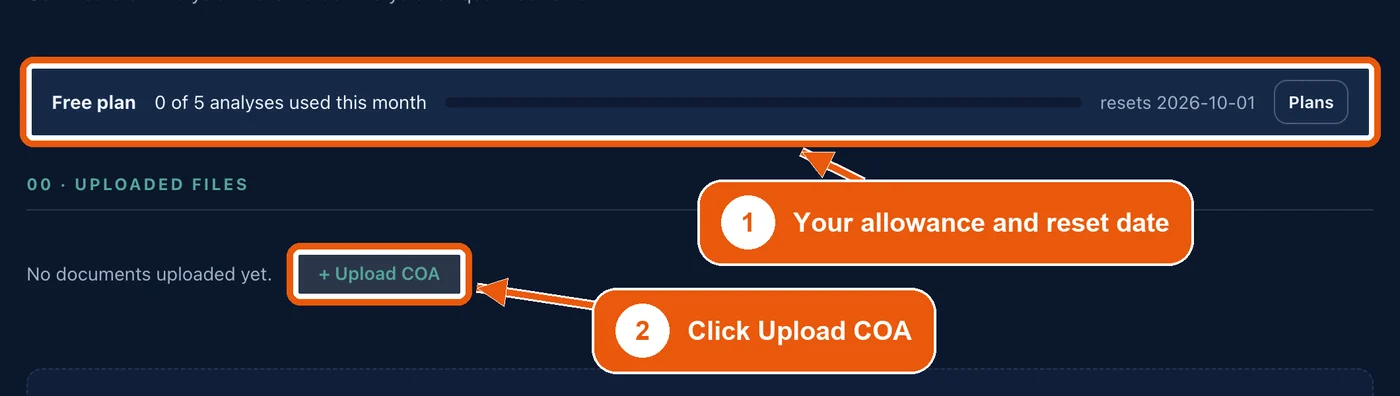
The dashboard is your home in PharmaTrust. The bar at the top (1) shows your plan, how many analyses you have used this month and the date the allowance resets. Plans, on the right of that bar, shows the paid options.
Below it is the list of uploaded files, empty for now. Click Upload COA (2) to add your first certificate. The same button sits at the top right of every screen.
Step 6. Upload the certificate
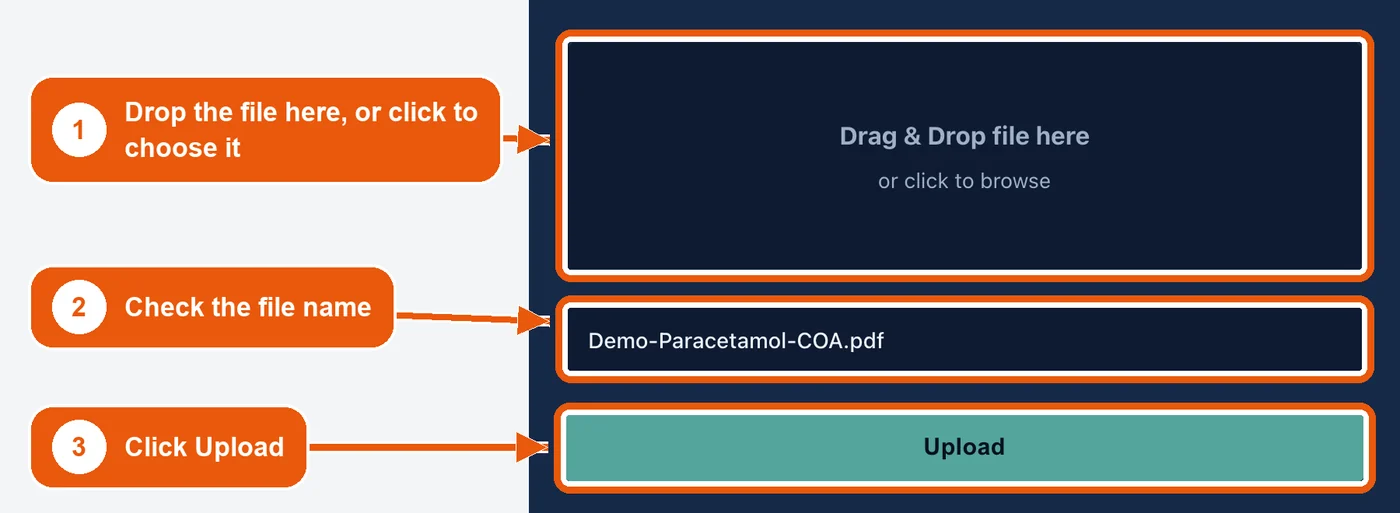
Drag the certificate onto the dotted box, or click the box and choose the file (1). PDF files, scans and photos are accepted. The file name appears below the box (2); check it is the right document, then click Upload (3).
Upload one certificate at a time, and upload the whole document: a certificate that runs over two pages should be one file with both pages.
- For a photo, lay the page flat, in good light, with all four edges in the picture and the text in focus.
- A straight, sharp scan reads better than a skewed or blurred one.
- Uploading does not use an analysis from your allowance.
Step 7. Go to the dashboard
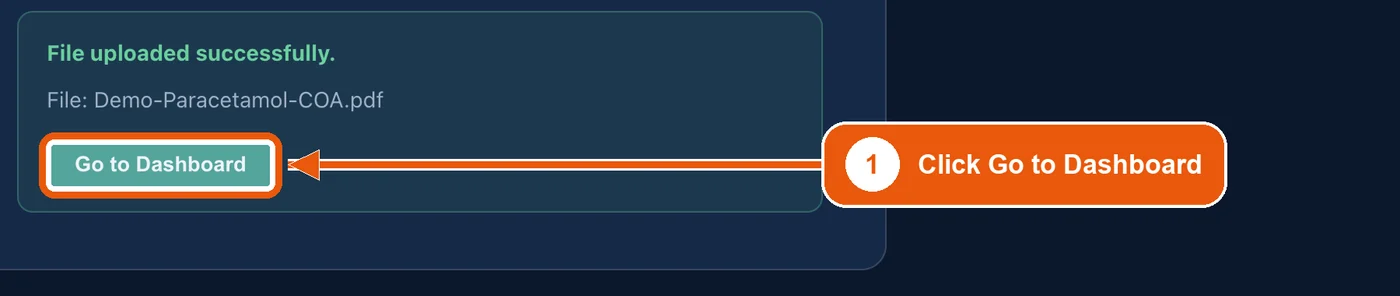
A green message confirms File uploaded successfully, with the file name. Click Go to Dashboard (1).
Step 8. Click Analyze
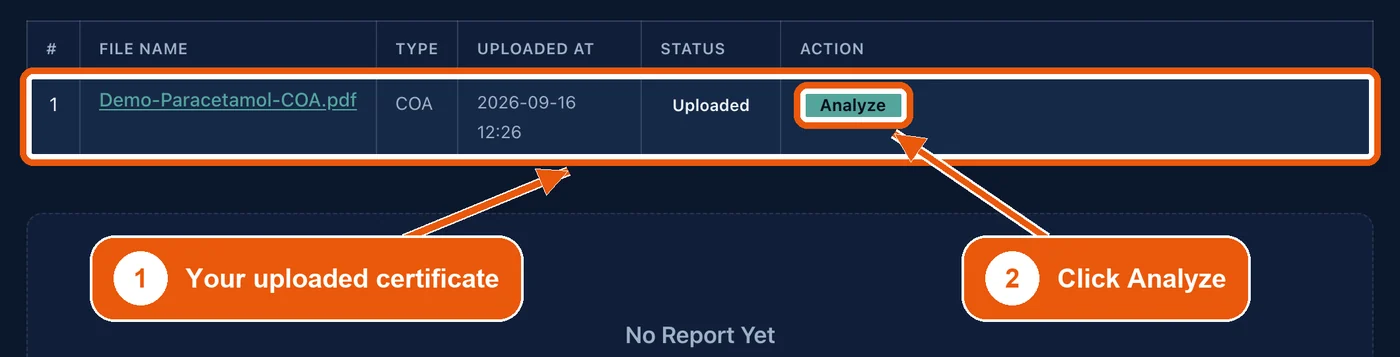
Your certificate is now listed under Uploaded files (1) with its type, upload time and the status Uploaded. Click the file name to open the original in a new tab if you want to check it.
Click Analyze (2) to start the Automated Analysis. This is the step that uses one analysis from your allowance.
Step 9. Wait for the analysis to finish
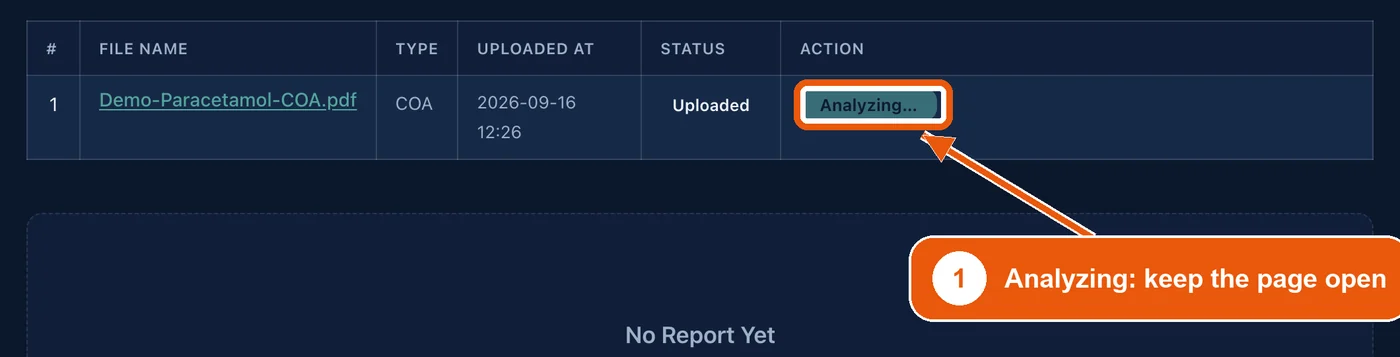
The button changes to Analyzing (1). A typical certificate takes minutes rather than hours; a multi-page scan takes longer. Keep the page open while it runs.
When it finishes, the status changes to Analyzed and the report opens underneath the file list.
Step 10. Open the report and check what it is about
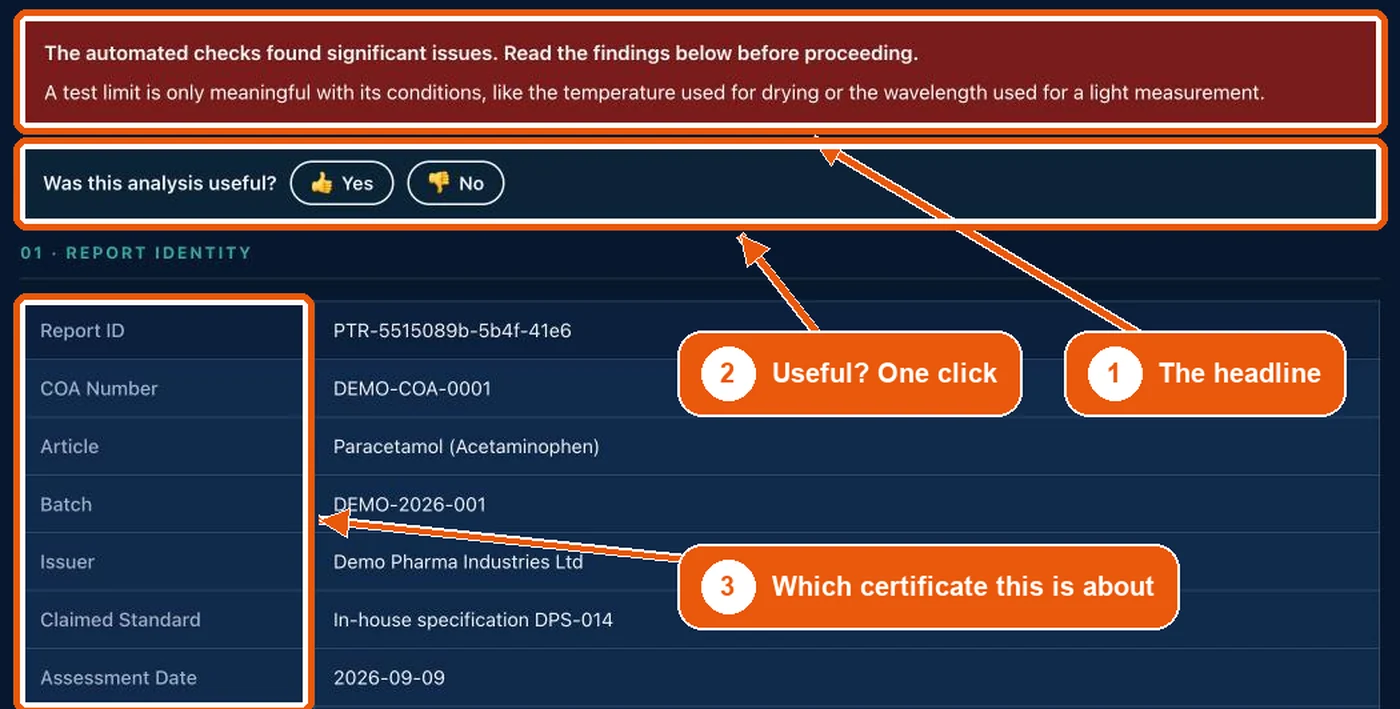
When the analysis finishes, the report opens below the file list. It starts with a headline (1): one sentence on what the checks found, and one line on why it matters. Under it you can tell us whether the analysis was useful (2); that click reaches the PharmaTrust team.
Section 01, Report identity (3), names the document the report is about: report ID, COA number, article, batch, issuer, the standard the certificate claims, and the assessment date. Check that it matches the certificate you meant to analyse before you read further.
Step 11. Work through the sections, starting with the open findings
Below the identity the report runs in numbered sections. Read 02 first for where the certificate stands, then 06 for exactly what is missing or does not add up. Every open finding ends with a Closes it line: what would close it, often evidence to ask the supplier for.
To see a complete report before uploading a certificate of your own, open the sample report page on this site. It was produced by the product from a synthetic certificate.
- 02 Final outcome: the overall result for the certificate, what it means before the material is used, and counts such as documentation points and analytical groups passing.
- 03 Decision summary: one row per assessment, with its outcome and a plain explanation.
- 04 Comparison against official requirements: each test on the certificate with its printed limit and result, the official requirement where one was found, the reasoning and the reference. Cross-checks against safety alerts, supplier registers and standards follow.
- 05 Supplementary evaluation: further checks on the certificate.
- 06 Open findings: one card per open item, stating the requirement, what was observed on the certificate, the source, and what closes it.
- 07 Scores and sources: how complete the certificate is as a document, the sources and versions used, and the limitations of the assessment.
Step 12. Download the report as a PDF
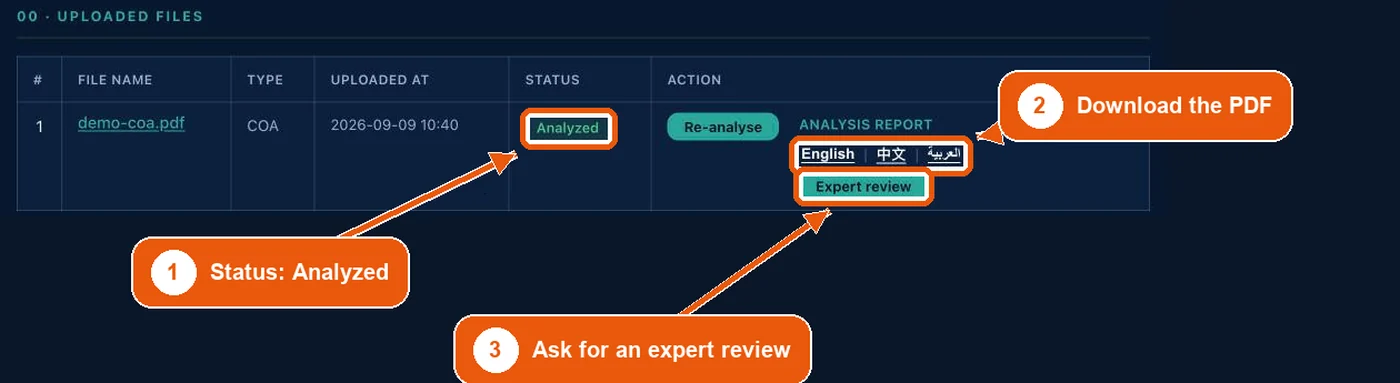
Once a certificate is analysed, its status in the file list reads Analyzed (1). Under Analysis report, click English to download the report as a PDF (2), ready to file or to send to a colleague or the supplier.
The 中文 and العربية links download reference translations in Chinese and Arabic. The English report is the version of record.
Step 13. Optional: ask for an expert review
Expert review is included in the paid plans. An authorised expert examines the certificate and the automated findings and issues an Expert-Reviewed Analysis with their own decision and reasons, within two business days.
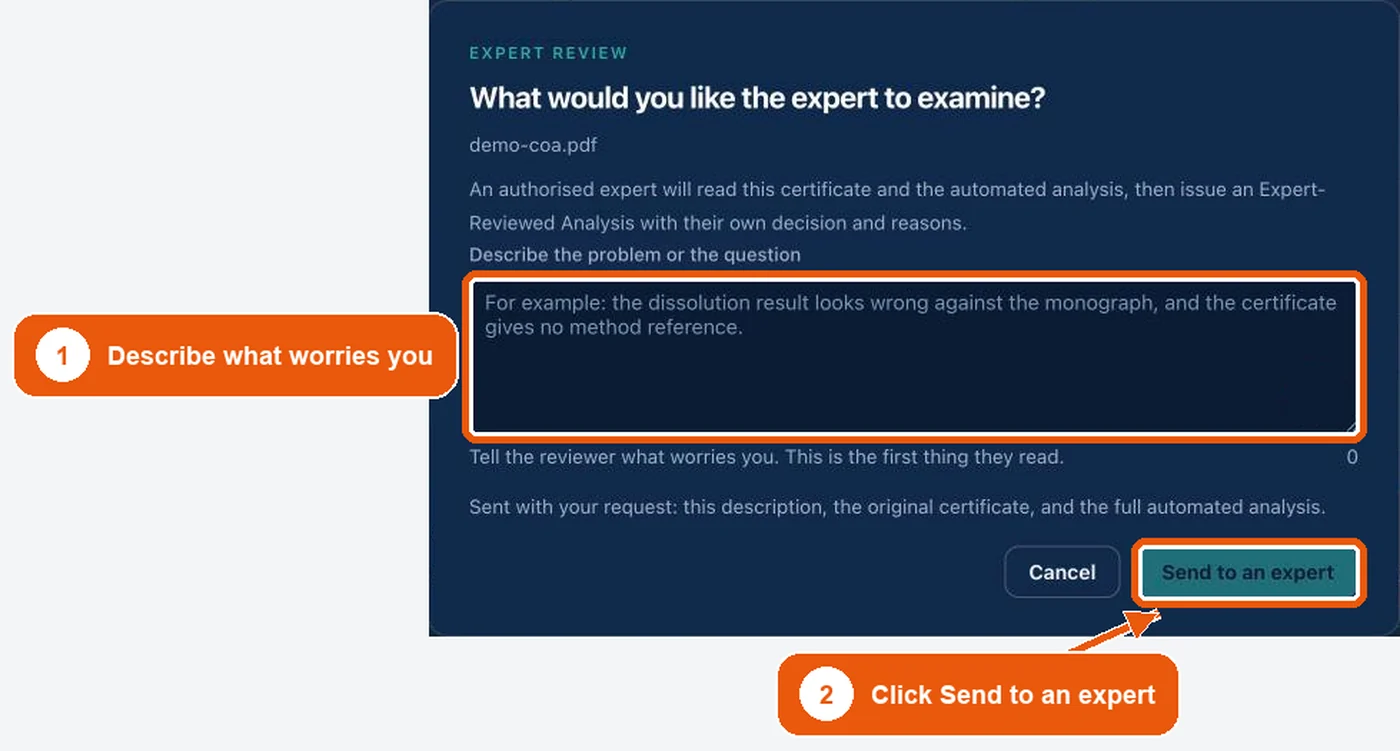
Click Expert review in the file's row (step 12, label 3). Describe what worries you (1); it is the first thing the reviewer reads. Then click Send to an expert (2). Your description, the original certificate and the full automated analysis go with the request. The request then appears under Expert reviews on your dashboard, where you download the Expert-Reviewed Analysis once it is issued.
If something goes wrong
Most problems have a short fix.
- Allowance used up: the dashboard says so, and Upgrade plan, in the bar at the top, shows the paid options. The free allowance resets on the date shown in the bar at the top of the dashboard.
- The certificate could not be read: upload the original PDF if you have it, or retake the photo flat, in good light and in focus, then click Analyze again.
- Anything else: click Need help? at the bottom right of any page and quote the document name.
What the report is, and what it is not
The report analyses a document, not a medicine. A perfect certificate can accompany a bad product, so a report with no open findings is a well-documented certificate, not a tested batch.
PharmaTrust supports qualified decision-making. It does not replace the responsible pharmaceutical or regulatory professional, does not certify compliance and does not grant regulatory approval.
Sources
- Sample report: a complete Automated Analysis of a synthetic certificate, PharmaTrust
- Plans and pricing, PharmaTrust
- Professional use notice, PharmaTrust
- Terms of Service, PharmaTrust
Primary sources are cited in preference to summaries. Where a source is licensed (for example a pharmacopoeial monograph) the reference is given and the text is not reproduced.
PharmaTrust Team
Written and reviewed by the PharmaTrust team against the primary sources cited above. Corrections are published, never made quietly.
Why we built this →Spotted an error or a newer figure? We correct within a week: info@pharmatrust.tech.